Why Your APC Ambient Sensors Are Invisible to Your RMM (And How to Fix It)

You did everything right.
You racked the UPS, seated the Network Management Card, ran the sensor cables, and pointed your RMM at the device over SNMP. Battery temp populates. Estimated runtime populates. Load percentage, input voltage, transfer events - all there.
The ambient temperature and humidity from those external sensors you just cabled up? Gone. Not wrong. Not erroring. Just absent, like they don't exist. And meanwhile, your APC NMC event log is filling up with "Unauthenticated Access" warnings from your monitoring probe's IP address.
Two problems. One device. The natural instinct is to connect them - assume the auth failures are blocking the sensor data somehow. That instinct is wrong, and chasing it will cost you hours. Here's what's actually happening.
The Quick Fix (TL;DR)
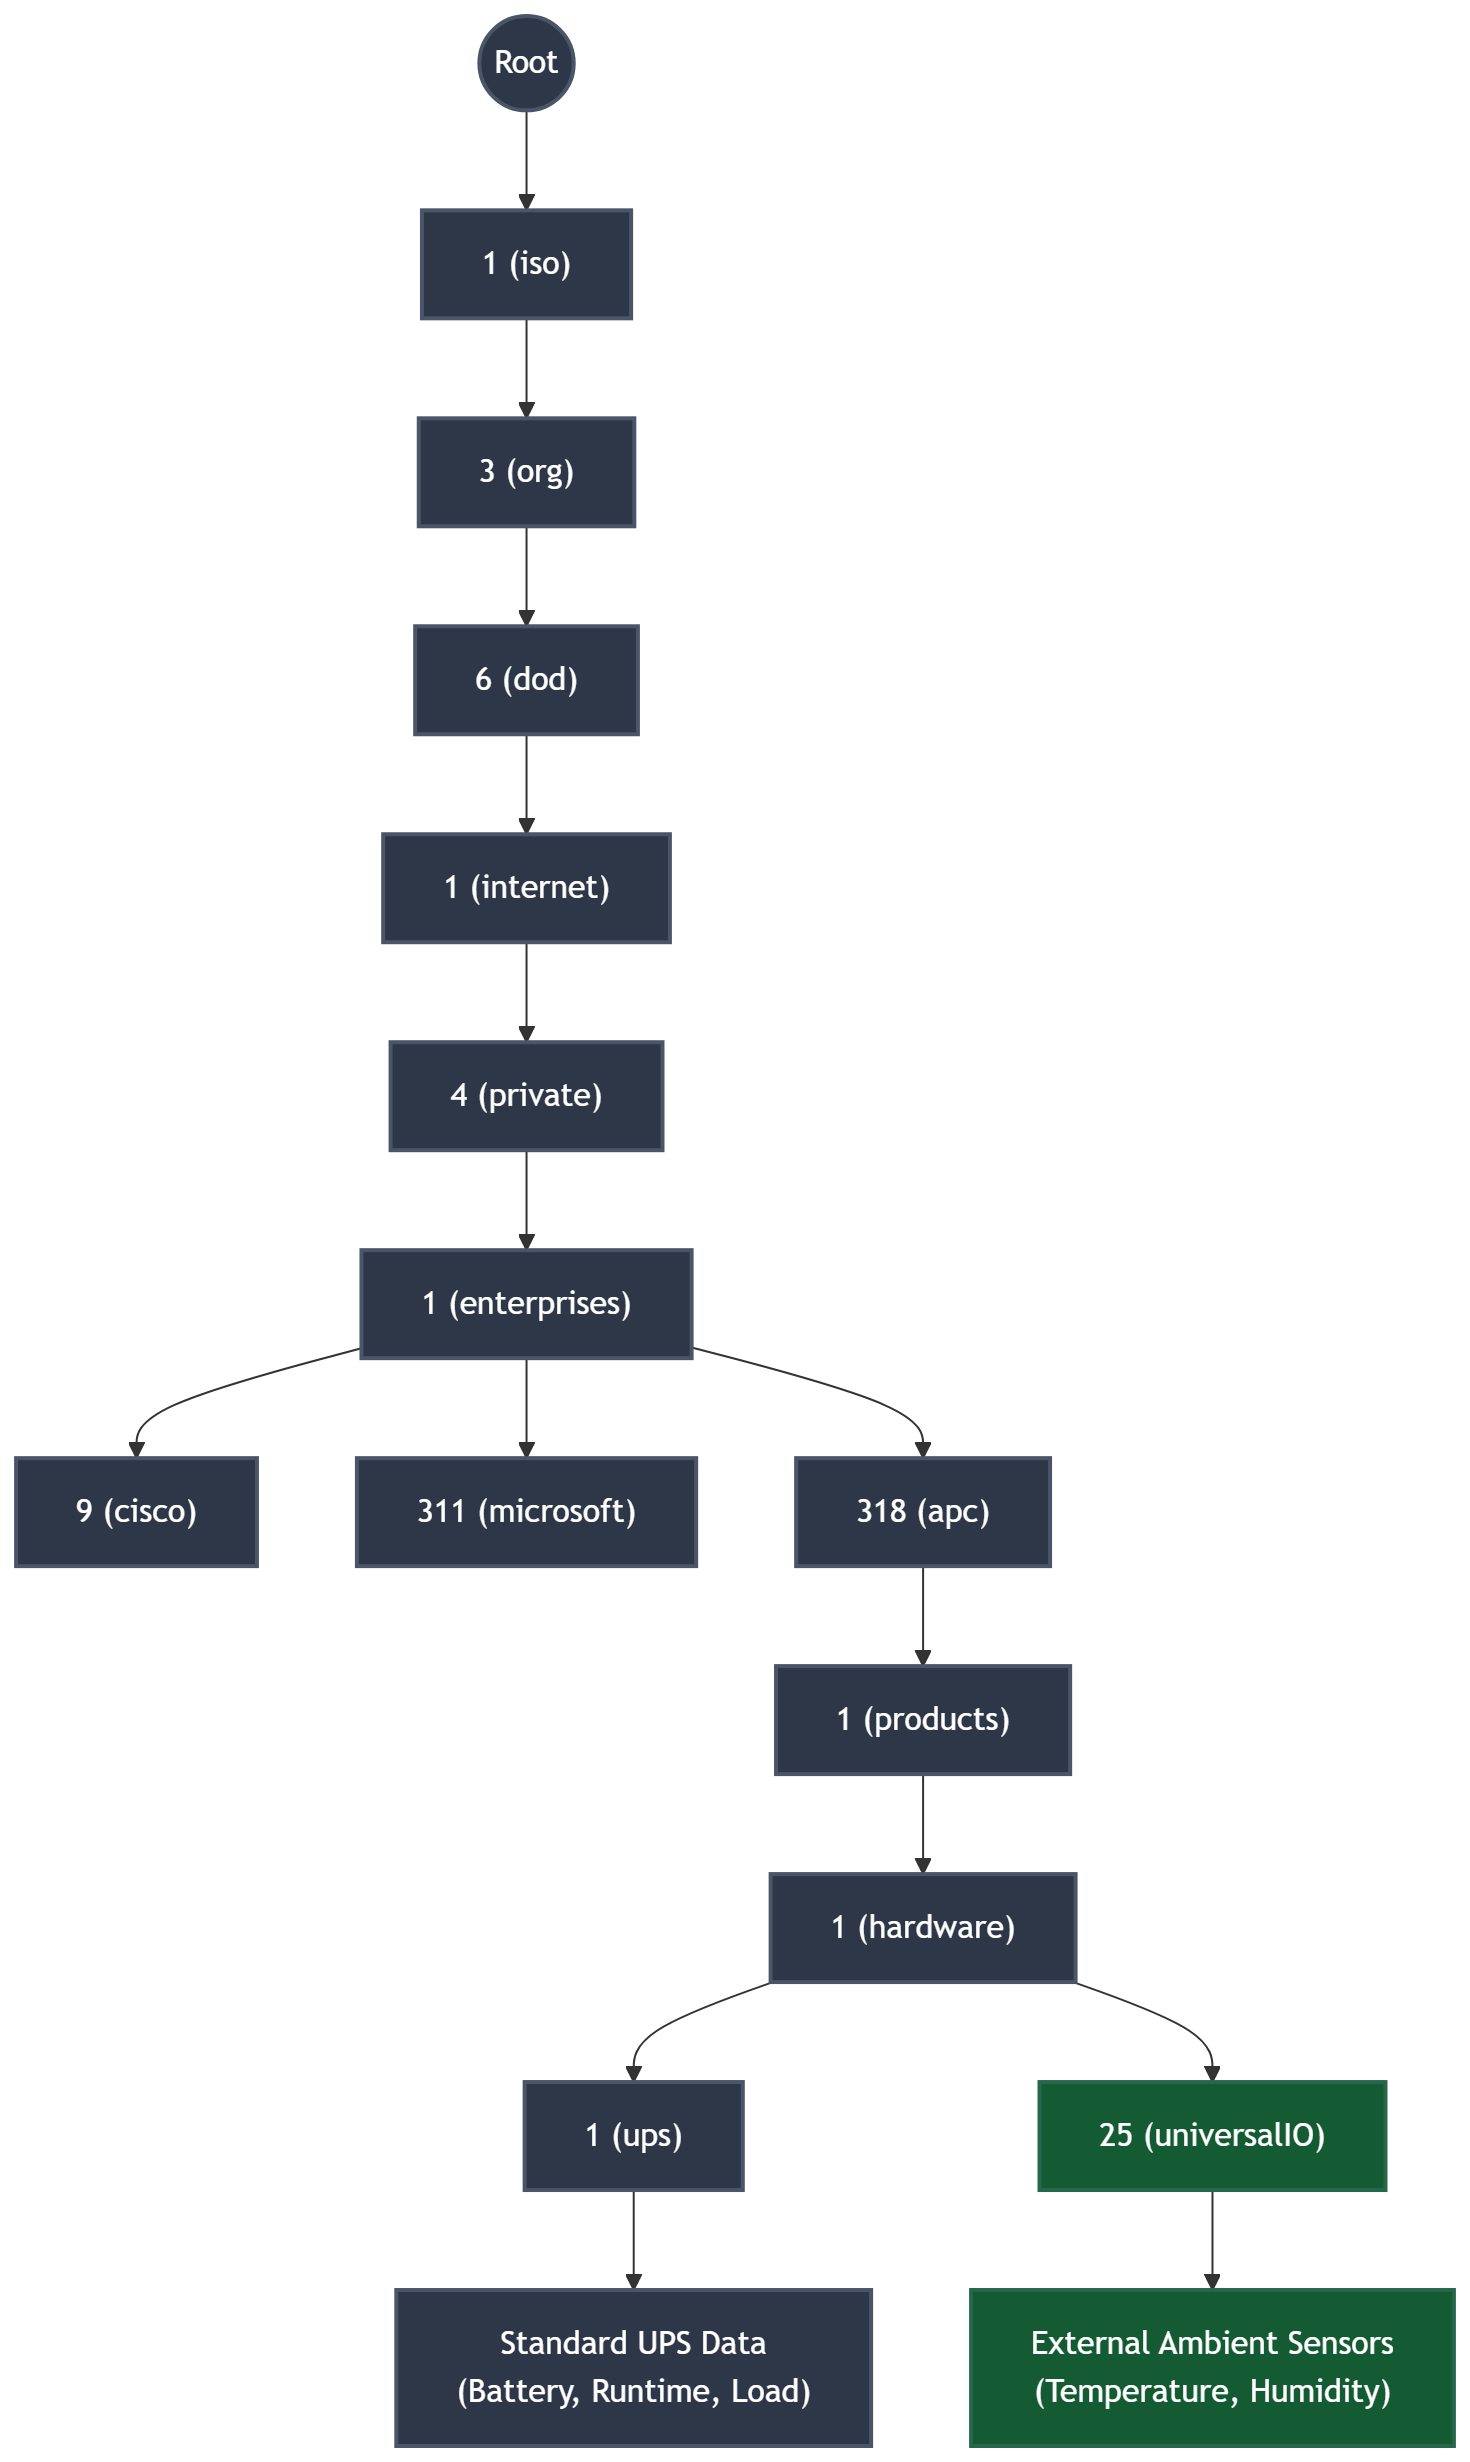
If it's late and you just need the data: your RMM is polling the standard APC UPS tree: .1.3.6.1.4.1.318.1.1.1.* but APC isolates external ambient sensors in a completely separate branch called the Universal I/O tree. Your monitoring platform isn't failing to read the sensor data. It's not asking for it. It doesn't know that branch exists.
Build a Custom SNMP Service targeting these OIDs directly:
| Metric | OID |
|---|---|
| Sensor 1 - Temperature (°C) | 1.3.6.1.4.1.318.1.1.25.1.2.1.6.1.1 |
| Sensor 2 - Temperature (°C) | 1.3.6.1.4.1.318.1.1.25.1.2.1.6.2.1 |
| Sensor 1 - Relative Humidity (%) | 1.3.6.1.4.1.318.1.1.25.1.2.1.7.1.1 |
| Sensor 2 - Relative Humidity (%) | 1.3.6.1.4.1.318.1.1.25.1.2.1.7.2.1 |
-1. That's not a misconfiguration. The hardware doesn't have a humidity element. More on that below.As for the authentication warnings: that's your RMM cycling through SNMPv3 and common community strings before it falls back to your configured v1 credential. Lock the probe to SNMPv1 with your known community string and the log spam stops.
If you want to understand why this is structured the way it is, how to walk the MIB yourself, and how to find these OIDs on any APC device without relying on someone else's documentation, keep reading.
A Brief History of OIDs and SNMP: Why a String of Numbers Runs Your Infrastructure
Before we get into the fix, it's worth understanding what you're actually looking at when you stare at a string like 1.3.6.1.4.1.318.1.1.25.1.2.1.6.1.1. Because it's not arbitrary. It's an address - precise, globally unique, and traceable all the way back to a standards body decision made in 1984.
The Origin: ASN.1 and the Need for Universal Identification
Object Identifiers aren't an SNMP invention. They're a general-purpose identification mechanism standardized jointly by the ITU and ISO/IEC for naming any object, concept, or thing with a globally unambiguous, persistent identifier. The formal definition comes from ITU-T recommendation X.208, which specifies Abstract Syntax Notation One, ASN.1, a data description language originally defined in 1984 as part of CCITT X.409. In 1988 it was split into its own standard. The substantially revised 1995 version, covered by the X.680–X.683 series, is still in use today.
The OID system is hierarchical. A tree. Each node is controlled by an authority that can define and delegate child nodes beneath it. The root has exactly three arcs:
0- ITU-T1- ISO2- Joint ISO/ITU-T
Everything in SNMP lives under the ISO branch. That's why every OID you'll encounter in network monitoring starts with 1. It's not convention. It's the tree.
SNMP: Putting OIDs to Work
SNMP was developed in the 1980s by the IETF as part of the Internet Protocol suite. SNMPv1 was formally published in May 1990 as RFC 1157 - authored by Case, Fedor, Schoffstall, and Davin. The protocol defined a straightforward mechanism: a management system queries a device agent using OIDs as addresses, and the agent returns values. GET, GETNEXT, SET, TRAP. That's most of it.
The protocol has gone through three major versions:
| Version | Key Characteristics |
|---|---|
| SNMPv1 (1990) | Original. Basic functionality, community string authentication. RFC 1157 |
| SNMPv2c (1993) | Improved performance and error handling. Still community-string security. |
| SNMPv3 (2002) | Adds real security - AES/DES encryption, SHA/MD5 authentication. |
SNMPv3 is the right answer on paper. In the field, on infrastructure devices like UPS systems, SNMPv1 is still everywhere. That's not an accident, it's inertia baked into hardware that gets replaced on a ten-year cycle if you're lucky.
Private Enterprise Numbers: How APC Ends Up at .318
IANA assigns Private Enterprise Numbers to organizations under the OID prefix 1.3.6.1.4.1 which in named-arc notation reads as iso.org.dod.internet.private.enterprise. Registration is free, first-come first-served. APC was assigned PEN 318 early in the registry, which reflects how long they've been in the networked power management space.
For reference: Cisco holds 9. Microsoft holds 311. Dell holds 674. Everything APC defines in their MIB lives under 1.3.6.1.4.1.318.*. That number isn't a product code or a version. It's their permanent address in the global OID namespace.
MIBs: The Codebook
A Management Information Base is the translation layer between raw OID numbers and human-readable meaning. MIB files are plain ASCII, organized hierarchically, defining a short-name syntax for each OID, its data type, and how it's used.
APC publishes theirs as the PowerNet MIB. It covers UPS devices, environmental monitors, transfer switches, and more. With it loaded into a MIB browser, 1.3.6.1.4.1.318.1.1.25.1.2.1.6.1.1 resolves to uioSensorStatusCurrentTemp.1.1. Without it, you're reading coordinates to a place that isn't on any map you own.
That's the context. Now the OID we're chasing stops looking like noise and starts looking like what it is, a precise walk from the ISO root, through the Internet branch, into private enterprise space, landing on APC's registered subtree, and navigating to a specific row in a specific sensor table.
Problem 1: The Authentication Warnings
This is the red herring. Get it out of the way first.
RMM probes are aggressive during device discovery. Even when you've explicitly configured SNMPv1 with a specific community string, the probe doesn't make a single polite request and wait. It cycles. A typical sequence looks something like this:
- Attempt SNMPv3 with default or empty credentials
- Attempt SNMPv1/v2c with common community strings:
public,private - Fall back to SNMPv1 with your configured community string
The NMC sees those first attempts, correctly rejects them, and logs each one as an authentication failure. By the time the probe arrives at the right credential, the connection succeeds but the event log already looks like someone's been trying to break in.
If your core UPS metrics are populating: battery temp, runtime, load; the authentication is working. The warnings are cosmetic. The probe is just making a mess on the way in.
That said, log noise buries real alerts. If the volume bothers you, find your probe's SNMP discovery settings and lock it to SNMPv1 with your known community string. Most RMMs let you disable the SNMPv3 fallback entirely. Do it. The warnings will stop and your event log will be useful again.
Problem 2: The Missing Ambient Data
This is the real issue. And the explanation is frustrating in its simplicity. Your RMM's default APC UPS service template queries the standard UPS MIB tree: .1.3.6.1.4.1.318.1.1.1.*
This tree is everything the UPS considers part of its core identity. Input voltage. Output load. Battery health. Internal temperature. Transfer events. Nine categories of UPS-specific OIDs, well-documented, and the foundation of every out-of-the-box APC monitoring template ever written.
Here's the problem: APC doesn't consider external ambient sensors to be part of the UPS. As far as the MIB architecture is concerned, those sensors are peripherals. External I/O devices that happen to be connected to the NMC. Their data lives in a completely separate branch: .1.3.6.1.4.1.318.1.1.25.*
The Universal I/O tree. Your RMM's default template has never heard of it. Your monitoring platform isn't broken. It's not failing to read the data. It's asking the right device the wrong question, and it doesn't know there's a better question to ask.
Finding the OIDs Yourself: Walking the MIB with SnmpB
You now know why the data is missing and which branch it lives in. But if you need to verify these OIDs against your specific hardware, or find equivalent branches on a different APC device, you need to walk the MIB yourself. That's not optional. It's the right way to do this.
My tool of choice is SnmpB: free, open-source, cross-platform, no account required. Grab it from SourceForge: https://sourceforge.net/projects/snmpb/
Step 1: Install SnmpB
Download the latest release. It's a lightweight Qt-based application. Install it and move on.
Step 2: Load the APC PowerNet MIB
Out of the box, SnmpB ships with standard IETF MIBs. It does not include the APC PowerNet MIB. Skip this step and your walk results come back as raw numeric OIDs, readable, but tedious.
To load it:
- Go to the Schneider Electric support site and pull the PowerNet MIB files. FAQ page FA156048 has the download. It's a
.zipcontaining one or more.mibor.txtfiles. - In SnmpB, go to Options > Manage MIB Modules.
- Point it at the folder where you extracted the files.
- Load
powernet.mib(sometimes namedpowernet443.mibdepending on version). SnmpB will compile it.
Once loaded, enterprises.apc appears in the MIB tree alongside the standard IETF branches. Now 1.3.6.1.4.1.318.1.1.25.1.2.1.6.1.1 resolves to uioSensorStatusCurrentTemp.1.1. That's the difference between navigating and guessing.
Step 3: Configure the Agent Profile
Tell SnmpB how to reach your NMC:
- Navigate to Edit > Agent Profiles (or the equivalent in your version).
- Create a new profile:
- Name: Something descriptive -
APC-UPS-ServerRoom-A - Address: IP address of your NMC
- Port: 161
- SNMP Version: SNMPv1 (or v2c if that's what your NMC is running)
- Community String: Your configured read community
- Name: Something descriptive -
- Save it and set it as the active agent.
Step 4: Walk the Full Device (Optional but Worth It)
If this is a device you're documenting for the first time, do a full walk from the root. Right-click the root node in the MIB tree and select Walk. SnmpB will issue sequential GETNEXT requests and traverse every OID the device responds to, typically 2,000-3,000 objects on a standard APC NMC.
The walk takes 30-90 seconds depending on latency. It's a polling operation, every GETNEXT is a round-trip. Run it once for discovery. Don't loop it against production devices.
What you get back is the complete map of what this specific device, on this specific firmware version, actually exposes over SNMP. Not what the documentation says it should expose. What it actually does.
Step 5: Walk the UIO Branch Specifically
For ambient sensors, scope the walk to the Universal I/O branch only.
Navigate to: iso > org > dod > internet > private > enterprises > apc > products > hardware > universalIO
Or paste 1.3.6.1.4.1.318.1.1.25 directly into the OID field if your version supports it.
Right-click and Walk. A scoped walk returns a manageable result set. You'll see something like this:
| OID (Numeric) | OID (MIB Name) | Type | Value |
|---|---|---|---|
.1.3.6.1.4.1.318.1.1.25.1.2.1.3.1.1 |
uioSensorStatusSensorName.1.1 |
STRING | "Temp Sensor 1" |
.1.3.6.1.4.1.318.1.1.25.1.2.1.6.1.1 |
uioSensorStatusCurrentTemp.1.1 |
INTEGER | 22 |
.1.3.6.1.4.1.318.1.1.25.1.2.1.7.1.1 |
uioSensorStatusCurrentHumidity.1.1 |
INTEGER | 45 |
.1.3.6.1.4.1.318.1.1.25.1.2.1.6.2.1 |
uioSensorStatusCurrentTemp.2.1 |
INTEGER | 24 |
.1.3.6.1.4.1.318.1.1.25.1.2.1.7.2.1 |
uioSensorStatusCurrentHumidity.2.1 |
INTEGER | -1 |
That last row, humidity returning -1 tells you the sensor on port 2 is an AP9335T. Temperature only. You just confirmed the hardware model without touching it.
Step 6: GET Individual OIDs
Once you've identified what you need from the walk, validate each OID individually before building your monitoring service:
- Enter a specific OID
1.3.6.1.4.1.318.1.1.25.1.2.1.6.1.1 - Click Get (not Walk - a single GET request).
- Confirm the value returned is what you expect.
This is the sanity check before you hardcode anything into your RMM. Sixty seconds of validation prevents hours of wondering why your dashboard is showing nonsense.
Why the Walk Matters
Walking a device before building monitoring is a discipline that pays for itself on every piece of SNMP-managed gear you'll ever work on. The walk tells you:
- Which OIDs actually exist on this specific hardware and firmware, not every OID defined in a MIB is implemented on every device
- What data types they return. This matters when your RMM asks how to interpret the value
- What the live values are, so you know
.6.1.1is actually temperature and not a status code - Which OIDs return
-1ornoSuchObjecttelling you a sensor isn't present or a feature isn't supported
It's reconnaissance. You do it once, map the terrain, and build with confidence. The alternative is guessing, and guessing in monitoring means silent failures at the worst possible time.
Alternative Tools
The workflow is identical regardless of what you use:
- iReasoning MIB Browser - Free personal edition. Java-based, cross-platform, polished GUI. ireasoning.com
- Paessler SNMP Tester - Free standalone tool from the PRTG team. Windows only, simple interface, good for quick queries. paessler.com
- Net-SNMP command-line -
snmpwalkandsnmpgeton Linux/macOS. No GUI, scriptable, pre-installed on most Linux distributions. net-snmp.org
Net-SNMP example: snmpwalk -v1 -c public 10.0.1.50 1.3.6.1.4.1.318.1.1.25
The tool doesn't matter. The walk does.
The Fix: Building a Custom SNMP Service
Create a Custom SNMP Service in your RMM and point it at the UIO OIDs directly. I arrived at these by running a full walk against the NMC, roughly 2,500 objects, and cross-referencing against APC's PowerNet MIB definitions. The ambient sensor values live in the .25.1.2.1 sub-branch, indexed by sensor port.
The OIDs
| Metric | OID |
|---|---|
| Sensor 1 - Temperature (°C) | 1.3.6.1.4.1.318.1.1.25.1.2.1.6.1.1 |
| Sensor 2 - Temperature (°C) | 1.3.6.1.4.1.318.1.1.25.1.2.1.6.2.1 |
| Sensor 1 - Relative Humidity (%) | 1.3.6.1.4.1.318.1.1.25.1.2.1.7.1.1 |
| Sensor 2 - Relative Humidity (%) | 1.3.6.1.4.1.318.1.1.25.1.2.1.7.2.1 |
How to Read the Structure
Once you see the pattern, extending to additional ports or sensor types is straightforward:
1.3.6.1.4.1.318- APC Enterprise (IANA PEN 318).1.1.25- Universal I/O Module.1.2.1- Sensor Data Table.6- Temperature value (°C).7- Humidity value (%).X.1- Sensor port index (1 = Port 1, 2 = Port 2)
You're not memorizing OIDs. You're reading a table.
A Note on Sensor Hardware
Before you build humidity monitoring, know what's physically plugged in:
- AP9335T - Temperature only. Querying the humidity OID against this sensor returns
-1. That's expected behavior, not a misconfiguration. - AP9335TH - Temperature and humidity. Both OID families return valid data.
If you're chasing a persistent -1 on a humidity metric, check the sensor model number before you touch the SNMP configuration. It's almost always a hardware limitation.
The Gotcha: Static Port Binding
There's a tradeoff in this approach that will bite you exactly once if you don't know about it.
These OIDs are bound to the physical port on the NMC - not to the sensor itself. The NMC has no concept of sensor identity. It knows "whatever is connected to Port 1" and "whatever is connected to Port 2." That's it.
| Your monitoring label | What you're actually reading |
|---|---|
| "Server Room A - Top of Rack" | Whatever sensor is in NMC Port 1 |
| "Server Room A - Cold Aisle Intake" | Whatever sensor is in NMC Port 2 |
If a technician pulls both sensors during UPS maintenance and reconnects them to the wrong ports, your dashboards won't error. They won't flicker. The data will silently swap. Port 1's OID now reports cold aisle temperatures under your "Top of Rack" label and you won't know until someone asks why the cold aisle is running 10°F warmer than usual.
How to Protect Yourself
Three things:
- Label the physical NMC ports. A label maker and thirty seconds prevents this entirely.
- Document the port-to-location mapping somewhere your team will actually see it - a config note in the RMM, an ITGlue or Hudu entry, even a comment in the custom service definition.
- Add a post-maintenance verification step. After any work on the UPS, pull up the ambient dashboard and sanity-check the readings before closing the ticket. If your rack exhaust is reading 68°F, someone swapped the cables.
Quick Reference
APC Enterprise Root: 1.3.6.1.4.1.318
Standard UPS Tree: 1.3.6.1.4.1.318.1.1.1.* Battery, runtime, load, input/output voltage, internal temp. What your default RMM template queries.
Universal I/O Tree: 1.3.6.1.4.1.318.1.1.25.* External ambient sensors, contact closures, dry contacts. Requires a custom service.
Key OID Patterns:
- Temperature (°C):
.25.1.2.1.6.[port].[index] - Humidity (%):
.25.1.2.1.7.[port].[index]
Net-SNMP Walk Command: snmpwalk -v1 -c [community] [ip] 1.3.6.1.4.1.318.1.1.25
PowerNet MIB Download: Schneider Electric FAQ FA156048
Closing
APC draws a hard architectural line between the UPS and everything attached to it. The default RMM templates only see one side of that line. The ambient data is there, the NMC is collecting it, it's fully accessible over SNMP, but you have to know which branch to ask for and build the query yourself.
And behind those strings of numbers is a system that's been quietly running since the 1980s. Built by standards bodies before most of the people using it were born, adopted by the IETF for network management, and still underneath every monitoring dashboard you've ever opened. It's not arcane. It's just old, and nobody explains where it came from.
The tools to explore it are free. The walk takes sixty seconds. And once you've done it once, you'll never blindly trust a default template again.
If you've found other undocumented OID branches on APC gear, Universal I/O extensions, contact closure mappings, anything the default templates miss, drop me a line. This stuff should be written down somewhere.