The Rebuild: Repair Install, NIC Teams From Scratch, and the Cluster Cert Nobody Warned Us About

The repair install took about 45 minutes. By the time it finished, six QLogic
adapters that had been dead for two days were showing clean in Device Manager with no errors.
That was the easy part.
What followed was a full network rebuild from a reference node, an iSCSI
reconnection, a cluster rejoin attempt that failed for a reason buried in the cluster
log, and a certificate problem that the repair install created and never mentioned.
This is article three of three. The resolution. It does not get easier, but it does
get done.
Why an In-Place Repair Install
An in-place repair install runs Windows setup from a matching ISO against an
already-installed OS and selects the option to keep files, applications, and
settings. Setup replaces Windows system files, the driver store, core OS binaries,
and the NDIS subsystem while preserving everything that is not part of the OS
itself - roles, applications, domain membership, user data, virtual machine
configurations.
For a Hyper-V host, this means the Hyper-V role stays installed, the virtual machine configuration files stay where they are, and VMs in Saved state remain in Saved state ready to start. The host comes back as the same server it was, running the same workloads, joined to the same domain, with a rebuilt OS underneath.
The alternative is a clean install followed by a full rebuild - rejoin the domain,
reinstall Hyper-V, reconfigure storage, re-import VMs, rebuild teams, rejoin the
cluster. That is a four to six hour process minimum, with more risk at every step.
The repair install was the correct call.
Mount the matching ISO, run setup.exe from within the running OS, and select "Keep personal files and apps" when prompted. Do not boot from the ISO - that path leads to a clean install.
What the Repair Restored
After the repair completed and the server rebooted, Device Manager showed all six
QLogic adapters with clean status. No yellow marks. No error codes. The qevbda.sys bus driver was running. The qenda.sys NDIS miniport was binding to all six child device instances correctly.
The Hyper-V role was intact. The VM that had been in Saved state on HV02 was still there, still in Saved state, ready to start.
Domain membership was intact. The computer account was valid. Group Policy applied on boot without issues.
Three things were not intact:
- All three LBFO NIC teams - gone
- The Hyper-V external vSwitch - gone
- All IP address, gateway, and DNS assignments - gone
The repair install rebuilds the NDIS subsystem and the driver store from scratch.
Part of that process is clearing the network binding state - which means LBFO team definitions, vSwitch bindings, and IP assignments all go with it. The server came back with six raw QLogic adapters and two Broadcom adapters, all unbound, all either on DHCP or with link-local addresses.
One additional issue: the repair install created a ghost. The Hyperv_Guest LBFO team still appeared in Get-NetLbfoTeam even though its underlying configuration was wiped.
The team referenced adapter GUIDs from before the repair that no longer existed in the same form. It was a WMI artifact, not a functioning team. It had to be removed before rebuilding to avoid conflicts.
Remove-NetLbfoTeam -Name "Hyperv_Guest" -Confirm:$false
Gone.
The Adapter Naming Problem
Before rebuilding anything, one complication had to be accounted for.
The repair install renamed several adapters by appending " 2" to their names. This
happens because Windows setup treats post-repair adapter instances as new
registrations in cases where the device instance path changes during the rebuild.
The hardware is the same. The driver is the same. But Windows sees them as distinct from their pre-repair selves and names them accordingly.
Some adapters kept their names. Others gained the suffix. Always verify actual
adapter names before scripting anything.
# Verify actual adapter names post-repair before building anything
Get-NetAdapter | Select-Object Name, InterfaceDescription, Status | Format-Table -AutoSize
This matters when scripting team creation. Any script or runbook that references
adapter names from before the repair will fail or target the wrong adapter. Verify
actual adapter names with Get-NetAdapter before building anything.
Rebuilding From the Reference Node
HV01 had been running the entire time HV02 was down. Its network configuration was authoritative - the exact teams, exact members, exact IPs, exact vSwitch config that HV02 needed to match.
Before starting any rebuild on HV02, pull the full configuration from the surviving
node. This is not optional. Do not work from memory.
# Run on HV01 - pull everything needed to rebuild HV02
Write-Host "=== NIC TEAMS ===" -ForegroundColor Yellow
Get-NetLbfoTeam | Format-List Name, TeamMembers, TeamingMode, LoadBalancingAlgorithm, Status

Write-Host "=== TEAM MEMBERS ===" -ForegroundColor Yellow
Get-NetLbfoTeamMember | Select-Object Name, Team, AdministrativeMode, OperationalStatus |
  Format-Table -AutoSize

Write-Host "=== IP ADDRESSES ===" -ForegroundColor Yellow
Get-NetIPAddress -AddressFamily IPv4 |
  Where-Object { $_.IPAddress -ne "127.0.0.1" } |
  Select-Object InterfaceAlias, IPAddress, PrefixLength | Format-Table -AutoSize

Write-Host "=== DEFAULT GATEWAY ===" -ForegroundColor Yellow
Get-NetRoute -DestinationPrefix "0.0.0.0/0" | Select-Object InterfaceAlias, NextHop

Write-Host "=== DNS SERVERS ===" -ForegroundColor Yellow
Get-DnsClientServerAddress -AddressFamily IPv4 |
  Where-Object { $_.ServerAddresses } |
  Select-Object InterfaceAlias, ServerAddresses | Format-Table -AutoSize

Write-Host "=== VSWITCH ===" -ForegroundColor Yellow
Get-VMSwitch | Select-Object Name, SwitchType, NetAdapterInterfaceDescription,
  AllowManagementOS | Format-Table -AutoSize

Write-Host "=== CLUSTER NETWORK INTERFACES FOR HV02 ===" -ForegroundColor Yellow
Get-ClusterNetworkInterface |
  Where-Object { $_.Node -eq "HV02" } |
  Select-Object Name, Network, Address | Format-Table -AutoSize
Also pull the iSCSI persistent target configuration from HV01 so you have the exact target IQN and portal address documented before touching anything on HV02.
# Run on HV01 - iSCSI config
Write-Host "=== iSCSI TARGET PORTALS ===" -ForegroundColor Yellow
Get-IscsiTargetPortal | Format-List *

Write-Host "=== PERSISTENT TARGETS ===" -ForegroundColor Yellow
iscsicli ListPersistentTargets
With that output in hand, the rebuild sequence on HV02 is straightforward.
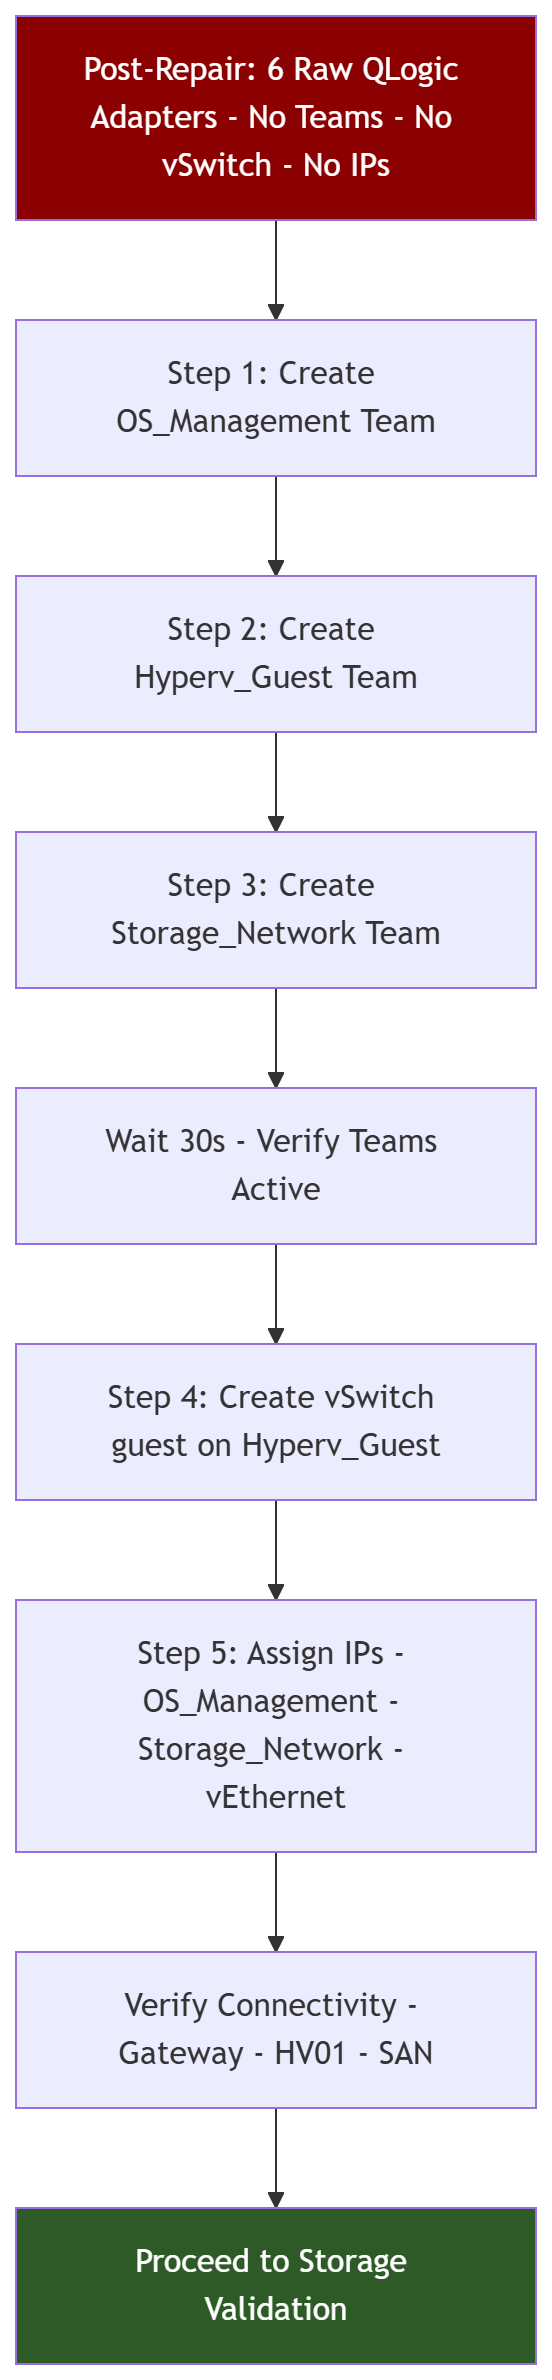
Teams first. vSwitch second. IPs third. Do not create the vSwitch before the
Hyperv_Guest team exists, and do not assign IPs before the teams are up.
# Step 1 - Create OS_Management team
# Management network, gateway, DNS
New-NetLbfoTeam -Name "OS_Management" `
  -TeamMembers "Integrated NIC 1 Port 1-1 2","Integrated NIC 1 Port 2-1 2" `
  -TeamingMode SwitchIndependent `
  -LoadBalancingAlgorithm Dynamic

# Step 2 - Create Hyperv_Guest team
# VM network, underlies vSwitch - no IP on the team itself
New-NetLbfoTeam -Name "Hyperv_Guest" `
  -TeamMembers "SLOT 1 Port 1","SLOT 1 2 Port 2" `
  -TeamingMode SwitchIndependent `
  -LoadBalancingAlgorithm Dynamic

# Step 3 - Create Storage_Network team
# Dedicated iSCSI path
New-NetLbfoTeam -Name "Storage_Network" `
  -TeamMembers "SLOT 3 2 Port 1","SLOT 3 2 Port 2" `
  -TeamingMode SwitchIndependent `
  -LoadBalancingAlgorithm Dynamic

# Wait for teams to initialize before proceeding
Start-Sleep -Seconds 30
Get-NetLbfoTeam | Select-Object Name, Status | Format-Table -AutoSize
# Step 4 - Create the Hyper-V external vSwitch on Hyperv_Guest team
# AllowManagementOS creates the vEthernet management OS adapter
New-VMSwitch -Name "guest" `
  -NetAdapterName "Hyperv_Guest" `
  -AllowManagementOS $true
# Step 5 - Assign IPs
# OS_Management - management subnet, gateway, DNS
New-NetIPAddress -InterfaceAlias "OS_Management" `
  -IPAddress "192.168.100.x" `
  -PrefixLength 24

Set-DnsClientServerAddress -InterfaceAlias "OS_Management" `
  -ServerAddresses "192.168.100.x"

New-NetRoute -InterfaceAlias "OS_Management" `
  -DestinationPrefix "0.0.0.0/0" `
  -NextHop "192.168.100.x"

# Storage_Network - iSCSI subnet, no gateway
New-NetIPAddress -InterfaceAlias "Storage_Network" `
  -IPAddress "10.10.10.x" `
  -PrefixLength 24

# vEthernet management OS adapter - created by AllowManagementOS above
# Use the IP pulled from Get-ClusterNetworkInterface on HV01 - do not guess
New-NetIPAddress -InterfaceAlias "vEthernet (guest) 2" `
  -IPAddress "192.168.100.x" `
  -PrefixLength 24
the repair install naming behavior. Use Get-NetAdapter to confirm the exact namebefore running the IP assignment.
Pull the correct IP for the vEthernet adapter from the surviving node
before starting the rebuild. The cluster database stores the last known IP for eachnode's network interfaces.
Use Get-ClusterNetworkInterface filtered to the broken node's name. Do not guess or assign a new IP - the cluster will not recognize it.
# Verify all teams and IPs before moving to storage validation
Write-Host "=== TEAM STATUS ===" -ForegroundColor Yellow
Get-NetLbfoTeam | Select-Object Name, Status | Format-Table -AutoSize

Write-Host "=== TEAM MEMBERS ===" -ForegroundColor Yellow
Get-NetLbfoTeamMember | Select-Object Name, Team, OperationalStatus | Format-Table -AutoSize

Write-Host "=== IP ADDRESSES ===" -ForegroundColor Yellow
Get-NetIPAddress -AddressFamily IPv4 |
  Where-Object { $_.IPAddress -ne "127.0.0.1" } |
  Select-Object InterfaceAlias, IPAddress, PrefixLength | Format-Table -AutoSize

Write-Host "=== CONNECTIVITY ===" -ForegroundColor Yellow
Test-NetConnection -ComputerName "192.168.100.x" -InformationLevel Quiet  # gateway
Test-NetConnection -ComputerName "192.168.100.x" -InformationLevel Quiet  # HV01
Test-NetConnection -ComputerName "10.10.10.20" -InformationLevel Quiet    # SAN
iSCSI: It Just Came Back
This was the one part of the rebuild that required no intervention.
The iSCSI initiator service (MSiSCSI) was running. The persistent target session -
configured before the failure and preserved through the repair - was intact in the
initiator's persistent target list. As soon as the Storage_Network team came up with a valid IP and the storage subnet had a route, the initiator reconnected to the SAN automatically.
# Verify iSCSI reconnected automatically
Get-IscsiSession | Select-Object IsConnected, IsPersistent, TargetNodeAddress | Format-Table -AutoSize

Get-IscsiConnection | Select-Object TargetAddress, InitiatorAddress | Format-Table -AutoSize
MPIO recognized all three LUNs immediately. All three MPIO disk paths came online with Round Robin with Subset policy intact. The Cluster Shared Volumes, visible through HV01, showed their disks accessible from both nodes within seconds of the storage network coming up.
# Verify MPIO paths and disk visibility
mpclaim -s -d

Get-Disk | Select-Object Number, FriendlyName, OperationalStatus, Size | Format-Table -AutoSize
This is what persistent iSCSI sessions are for. Configure the target portal and the
persistent session once, and the initiator handles reconnection automatically whenever the network path is restored. No manual intervention required after a network outage.
The Cluster Rejoin: First Attempt
Networking verified. Storage verified. VMs visible. Time to rejoin the cluster.
The cluster service on HV02 was running. HV01 showed HV02 as Down. Standard
procedure: restart the cluster service on HV02 and attempt to resume the node.
# From HV01
Get-ClusterNode | Select-Object Name, State | Format-Table -AutoSize
# From HV02 - restart cluster service
Restart-Service ClusSvc
# From HV01 - attempt to resume
Resume-ClusterNode -Name "HV02"
Failed. The error from HV01: the remote server has been paused or is in the process of being started. HV02's cluster service was running but unable to establish communication with HV01 despite full TCP connectivity on all three cluster networks.
Pinging HV01 from HV02 on all three network paths worked. Port 3343 was open and responding. TCP connections were completing. The network was not the problem.
Rebooted HV02 to allow the cluster service to initialize cleanly with all networking
in place from boot. Same result after reboot. HV01 still showed HV02 as Down.
Reading the Cluster Log
When a cluster node cannot join and the network is demonstrably working, the answer is in the cluster log.
# Run on HV02
Get-ClusterLog -Node "HV02" -Destination "C:\Logs" -UseLocalTime
The log showed successful TCP connections being established from HV02 to HV01 on port 3343 across all three cluster networks. Traffic was flowing. Then immediately after each connection established, the authentication failed.
The specific errors in the log:
mscs_security::SchannelSecurityContext::AuthenticateAndAuthorize:
Cluster certificate doesn't exist

Schannel Authentication or Authorization Failed
Windows Server failover clustering uses Schannel - the Windows TLS implementation - for encrypted inter-node authentication on port 3343. Each cluster node has a certificate that the other nodes use to verify its identity. These are machine certificates tied to the cluster, not to the domain. They are generated when a node joins the cluster and stored in the local machine certificate store.
The in-place repair install destroyed them.
Not the domain certificates. Not the computer account certificates used for domain
authentication. The specific cluster inter-node Schannel certificates. They were
gone. HV01 could not authenticate HV02's connection because HV02 had no certificate to present. Every connection attempt on every network succeeded at the TCP layer and failed immediately at the authentication layer.
This is not documented prominently anywhere. The repair install notes say files,
apps, and settings are preserved. They do not say "except for cluster inter-node
Schannel certificates." You find out from the cluster log.

The Fix: Evict and Re-Add
You cannot manually regenerate cluster inter-node certificates. They are created
by the cluster service during the node join process. The only way to get new valid
certificates on HV02 is to remove it from the cluster and re-add it, which triggers
the join process and certificate generation.
This sounds drastic. It is not. The cluster database lives on the quorum resource
and on HV01. Removing HV02 from the cluster does not touch the quorum or any cluster configuration. It removes HV02's node record from the cluster database. Re-adding it creates a new node record with new certificates.
The VMs on HV01 are unaffected. The CSVs stay online. Nothing moves.
# From HV01 - evict HV02 from the cluster
# HV02 must be in Down state for this to work without the Force flag
# Force flag is safe here - the node is unreachable from the cluster's perspective

Remove-ClusterNode -Name "HV02" -Force
# From HV02 - clear the residual cluster configuration
# This removes the cluster service configuration, the cluster database copy,
# and the stale certificate material from the local machine

Clear-ClusterNode -Force
# From HV01 - re-add HV02 to the cluster
# This runs the full join process, generates new inter-node Schannel certificates,
# synchronizes the cluster database to HV02, and registers HV02 as a full member

Add-ClusterNode -Name "HV02"
The Add-ClusterNode operation takes about two minutes. During that time it validates the node, runs prerequisite checks, synchronizes the cluster database to HV02, and generates the inter-node Schannel certificates on both sides.
When it completes, both nodes show Up.

Validation
Full verification before declaring recovery complete. Not done until all of this
passes.
# Both nodes Up
Get-ClusterNode | Select-Object Name, State | Format-Table -AutoSize
# All cluster networks Up on both nodes
Get-ClusterNetwork | Select-Object Name, State, Role | Format-Table -AutoSize
Get-ClusterNetworkInterface | Select-Object Name, Node, Network, State, Address | Format-Table -AutoSize
# CSVs Online
Get-ClusterSharedVolume | Select-Object Name, State, OwnerNode | Format-Table -AutoSize# iSCSI connected and persistent
Get-IscsiSession | Select-Object IsConnected, IsPersistent, TargetNodeAddress | Format-Table -AutoSize
Get-IscsiConnection | Select-Object TargetAddress, InitiatorAddress | Format-Table -AutoSize# MPIO paths healthy
mpclaim -s -d
# No adapter errors
Get-PnpDevice | Where-Object { $_.Class -eq "Net" } | Where-Object { $_.Status -ne "OK" } | Select-Object Status, FriendlyName | Format-Table -AutoSize
Everything passed. Two nodes Up. Three cluster networks Up across both nodes.
Both CSVs Online. iSCSI connected and persistent. Three MPIO LUNs with all paths active.
Live migration test.
The most honest validation for a Hyper-V cluster is moving a running VM and watching it keep running.
# Live migrate three VMs to HV02 to confirm full cluster functionality
Move-VM -Name "DC01" -DestinationHost "HV02" -Live
Move-VM -Name "ExchangeVM" -DestinationHost "HV02" -Live
Move-VM -Name "FileServer" -DestinationHost "HV02" -Live

# Confirm they are running on HV02
Get-VM | Select-Object Name, State, ComputerName | Format-Table -AutoSize
All three migrated successfully. All three continued running on HV02 without
interruption. No dropped connections, no timeouts, no errors.
Recovery confirmed. Monitoring cleared at 10:36 AM the following morning.

The Runbook, Written Now
The hardest part of this rebuild was doing it without a runbook. Pulling the
reference configuration from HV01 while HV02 was broken worked, but it only worked because HV01 was healthy. If both nodes were in trouble at the same time, the reference would not have been available.
Document your cluster node network configuration now, while everything is working.
Specifically:
- Every LBFO team: name, members by adapter name AND by physical slot and port, teaming mode, load balancing algorithm
- Every team's IP, prefix, gateway, and DNS
- The vSwitch: name, bound team, AllowManagementOS setting
- The vEthernet management adapter name and its IP
- The iSCSI target portal address and target IQN
- The cluster network interface IPs from Get-ClusterNetworkInterface
# Run this on both nodes and save the output somewhere accessible
# that does not depend on the servers being healthy

Write-Host "=== NODE: $(hostname) ===" -ForegroundColor Yellow
Write-Host "=== NIC TEAMS ===" -ForegroundColor Cyan
Get-NetLbfoTeam | Format-List Name, TeamMembers, TeamingMode, LoadBalancingAlgorithm

Write-Host "=== TEAM MEMBERS ===" -ForegroundColor Cyan
Get-NetLbfoTeamMember | Select-Object Name, Team, OperationalStatus | Format-Table -AutoSize

Write-Host "=== IP ADDRESSES ===" -ForegroundColor Cyan
Get-NetIPAddress -AddressFamily IPv4 |
  Where-Object { $_.IPAddress -ne "127.0.0.1" } |
  Select-Object InterfaceAlias, IPAddress, PrefixLength | Format-Table -AutoSize

Write-Host "=== GATEWAY ===" -ForegroundColor Cyan
Get-NetRoute -DestinationPrefix "0.0.0.0/0" | Select-Object InterfaceAlias, NextHop

Write-Host "=== DNS ===" -ForegroundColor Cyan
Get-DnsClientServerAddress -AddressFamily IPv4 |
  Where-Object { $_.ServerAddresses } |
  Select-Object InterfaceAlias, ServerAddresses | Format-Table -AutoSize

Write-Host "=== VSWITCH ===" -ForegroundColor Cyan
Get-VMSwitch | Select-Object Name, NetAdapterInterfaceDescription, AllowManagementOS

Write-Host "=== iSCSI ===" -ForegroundColor Cyan
Get-IscsiTargetPortal | Select-Object TargetPortalAddress, TargetPortalPortNumber
iscsicli ListPersistentTargets

Write-Host "=== CLUSTER NETWORK INTERFACES ===" -ForegroundColor Cyan
Get-ClusterNetworkInterface | Select-Object Name, Node, Network, Address |
  Format-Table -AutoSize
Store it somewhere that does not depend on the servers being healthy to access.
A network share that lives on both cluster nodes is not that place.
What Changes After This
Three things need to happen before the next maintenance window and they are not
optional.
Cable the out-of-band NICs.
Both nodes have Broadcom embedded NICs physically disconnected. Plug them in. Assign management IPs. Do not put them in any team and do not give them a default gateway that conflicts with OS_Management. They exist for one purpose: remote access when everything else is broken. Two days of iDRAC virtual media console instead of a direct RDP session cost time and added friction to every step of this recovery. One cable and one IP address fixes that permanently.
Add adapter-level and iSCSI-level monitoring.
Monitoring caught the node failure. It did not catch the failure building. NIC team
member status, iSCSI session state, and MPIO path health are all pollable. A single
team member going failed is not a crisis. It is a warning. Watch for warnings before they become outages.
Firmware and driver update, both nodes, one at a time.
The root cause of the original driver corruption was never definitively identified.
Running outdated firmware alongside current drivers - or the reverse - is a known
contributor to driver stability issues on adapters like the FastLinQ series. Get both
nodes to current Dell-recommended firmware and driver versions during a maintenance window. Do one node at a time. Live migrate everything to the healthy node, patch the empty node, migrate back, repeat.
Closing
Two days. Ten hours of hands-on work. A repair install, a full network rebuild, and
a cluster certificate problem that the documentation does not mention.
The cluster did its job. Production stayed up. No data was lost. The failover
architecture that looked like overhead until it was needed turned out to be worth
every dollar it cost to build.
But the margin was thin. One more failure on HV01 during those 48 hours would have been a complete outage. Recovery speed matters in a two-node cluster. Anything that slows it - no out-of-band access, no documented runbook, no exported driver set sitting on a USB drive - extends the window where a second failure ends everything.
Fix the Broadcom ports. Write the runbook. Update the firmware.
Do it before the next alert fires.